Making a Square
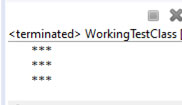
Sure, it is exciting to be able to print three asterisks in a row, but wouldn't you like to draw a better picture? How about drawing a square that is offset from the side of the screen, something like the following:

This will require a couple of extra commands, or methods as we now know they are. There must be a method to create some spaces so that we can offset the asterisks from the left side of the screen, and there must be a method that tells the computer to stop printing on one line and go to the next one. The methods are called printSpace and printEndline; notice that the method names clearly explain what they do; this is called self-documentation, and again, implementing this style leads to high quality, readable programs.
Before you read on, think about what it would take to use the methods you have been given to create a square that is offset three spaces from the left side of the screen. As you think about the display process, think about how you would type it if that is what you were doing. You would type space, space, space, asterisk, asterisk, asterisk, and then you would press your computer's ENTER key. That is exactly what the following program does. Check it out.
    public static void main( String[] args )
   {
    // print an endline
       // method: printEndLine
    printEndLine();        // print first line
       // method: printSpace, printAsterisk, printEndline
    printSpace();
    printSpace();
    printSpace();
    printAsterisk();
    printAsterisk();
    printAsterisk();
    printEndLine();      // print second line
       // method: printSpace, printAsterisk, printEndLine
    printSpace();
    printSpace();
    printSpace();
    printAsterisk();
    printAsterisk();
    printAsterisk();
    printEndLine();        // print third line
       // method: printSpace, printAsterisk, printEndLine
    printSpace();
    printSpace();
    printSpace();
    printAsterisk();
    printAsterisk();
    printAsterisk();
    printEndLine();
  }
At this point, you should be able to do this yourself but the video for this is found below.
To continue with the concept of modularity, each of the blocks of code, called code blocks, is essentially a module that takes care of displaying one line of the output. Later on, modularity will be applied by creating separate methods which will contain their own segments of code that are created and associated with an identifier so that when the identifier is called, the segment of code will be implemented; methods are a kind of subroutine, which are used to create well structured, modular programs.
Methods may be simple commands that implement an action (i.e., displayAsterisk), they may be actions that generate new data (i.e.,generateRandomNumber), or they may be processors that accept data from the calling method, and manipulate the data to as to provide a desired result (i.e., getSquareRoot). Blocks of code will always be used to demonstrate good code structure, but the modularity is going to evolve as this reference progresses.
Watch this video and write your own box-making program. Remember the difference between learning and not learning is doing.