Creating and Using Simple functions
Starting Out
A short review. The first two things to learn about functions are already history to you. You have been using functions all along in this course. You implemented commands in the form of functions in order to draw pictures with asterisks, as shown below.
   printSpace();
   printSpace();
   printSpace();
   printSpace();
   printAsterisk();
   printAsterisk();
   printAsterisk();
   printEndLine();
The above functions created the following output, and you can watch this video to see the program work.
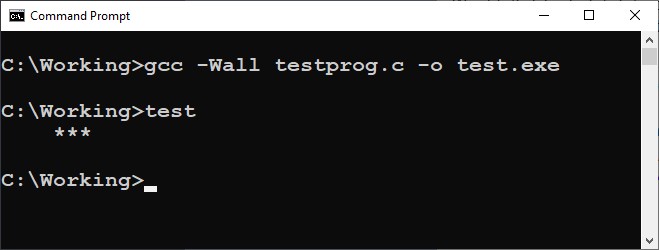
This was pretty straightforward, and thanks to the "English-like" characteristics of the C programming language, it made pretty good sense what was happening.
How to Write a function
Suppose now that you were asked to create a box of characters that was three asterisks wide and three asterisks tall. Wouldn't it be helpful if you could abstract the process of creating one line on the screen as a function, and then just call this three times to make the box? Here is how you can do this, in step-by-step form.
First create the header of the function. The header has three primary parts: 1) the return data type, 2) the function identifier or name, and 3) the function parameter(s) which may also be called the parameter list, which are located in the parentheses following the identifier. The parameters and return quantity will be discussed in a later topic, but for now you can observe what the simplest function looks like, and how to put it together. In addition, be advised that this function only does output, and does not return any processed results. So, it returns nothing . . . and the word for returning nothing in C is void. You are already familiar with the other parts, so here is what the function header looks like.
void printOneLine()
To review the parts: 1) the function return data type is void, 2) the identifier is printOneLine, and 2) for this function, there is no need for parameters since the number of spaces and asterisks will be fixed inside the function. However, note that the parentheses are still required, and are always required for functions.
The next part of writing the function is to create the empty body. This is easy; just go to the next line, type three spaces, type an open curly brace, type two or three ENTERs to make vertical space, then type three spaces, and type a close curly brace. Unless you want to spend hours chasing down missing curly braces, you will always create the empty body first, which then includes both the open and closed curly braces. Here is the whole package.
   public static void printOneLine()
      {


      }
Once you have the empty code block, you can go to work. In this case, you will write in the statements that are necessary to solve the problem; these are written in English, or pseudocode so that you can verify that your function will do what it is supposed to do before you write any code. To wit:
   void printOneLine()
      {
       // print four spaces
       // print three asterisks
       // print an endline
      }
Finally, with the function actions clearly specified, it is trivial to write in the code. Here are the results.
   void printOneLine()
      {
       // print four spaces
       printSpace();
       printSpace();
       printSpace();
       printSpace();

       // print three asterisks
       printAsterisk();
       printAsterisk();
       printAsterisk();

       // print an endline
       printEndLine();
      }
Now some consideration as to what has happened. You wrote a header, made an empty code block, wrote in what you wanted to do, and then filled in the code. This is not terribly difficult, but there are a few more things to note.
- There is no semicolon after the function header. As mentioned earlier in this reference, under some circumstances when a code block follows some initial code segment, the statement is not completed until the end of the code block (i.e., the closing curly brace). This is that circumstance.
- The code that is written to make the function do what it is supposed to do is called function implemention code, or usually just the function implementation. Remember this term as you will be asked many times to create a function implementation.
- The function implementation is located, well . . . , in the function implementation part of your program. This is the area you have already been identifying with comments. Now you have something to put there.
Watch this video on how to create the printOneLine function. As always, practice along with it. You will be writing a lot of functions from now on. This will also show you where to put your function implementation, and it will show you how to call the function in order to test it. The resulting output is shown here (and looks a lot like the one you viewed previously).
Try it again. Your next function can be simpler because you will have abstracted part of the process with the function you have created. The abstracted function prints one line with four advanced spaces and three asterisks. Now what if you want to take this tool and make a box. The process is very easy, but take a look anyway. First, you create the header and succeeding code block, as shown here. Once again, never type an open curly brace without a closed one right after; this will save you hours later on.
   void printBox()
      {


      }
Now, design the function, as shown.
   void printBox()
      {
       // display the first line of the box
          // function: printOneLine

       // display the second line of the box
          // function: printOneLine

       // display the third line of the box
          // function: printOneLine
      }
Finally, drop in the code. As you have seen before, this is trivial as long as you have taken the time to design and write the function first.
   void printBox()
      {
       // print three lines with spaces and asterisks
          // function: printOneLine
       printOneLine();

       printOneLine();

       printOneLine();
      }
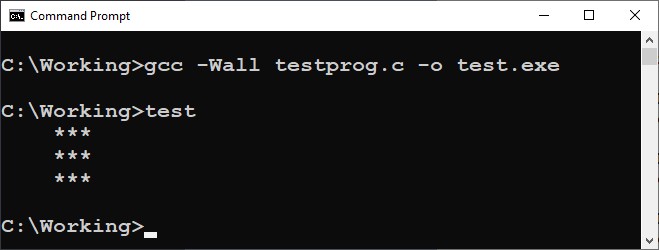
Watch this video to see this function created and then the function used in the program. When the program is run and this function is called, the following box is displayed.
Of course, the function must be called within a program, so there is a little more to the larger process as you saw in the video. Shown below is the whole program including the parts you wrote. You can assume that the printAsterisk, printSpace, and printEndLine functions were created for your use in the lower part of the source code file so they are not shown. Acquiring tools from other files was addressed in the formatted command-line and formatted console I/O topics. You will see this strategy applied for other tools later on as well.
// header files
#include <stdio.h>

// global constants
const char ASTERISK_CHAR = '*';
const char SPACE_CHAR = ' ';

// Function Prototypes
void printAsterisk();
void printBox();
void printEndline();
void printOneLine();
void printSpace();

// main function
int main()
   {
    // call printBox to test function
       // function: printBox
    printBox();

    // end program with return success
    return 0;
   }

// function implementation
int printBox()
   {
    // print three lines with spaces and asterisks
       // function: printOneLine
    printOneLine();
    printOneLine();
    printOneLine();
   }

void printOneLine()
   {
    // print four spaces
       // function: printSpace
    printSpace();
    printSpace();
    printSpace();
    printSpace();

    // print three asterisks
       // function: printAsterisk
    printAsterisk();
    printAsterisk();
    printAsterisk();

    // print end line
       // function: printEndline
    printEndline();
   }

// printAsterisk, printSpace, and printEndline functions would also
// be implemented here
Now that you are learning to develop functions, you can see how the function parts (i.e., the function prototypes, usage, and implementation) are placed in the larger program source code. This organization was provided to you in earlier chapters but it is worth continuing to recognize and practice it.
The final point is the big one, and it is related to the title of this chapter. By definition, your printAsterisk, printSpace, and printEndLine functions are abstracted because you only know what they look like and what they do; you don’t have to know how they work. Next, you abstracted one line of display by creating a function that displayed one line (i.e, printOneLine); you took away the details and gave yourself a single identifier that represented those details, and printed one line. But you didn’t stop there. You then created a printBox function that abstracted the process of printing a box and left out the details of printing one line three times, and printing asterisks, spaces, and endlines. As you will see later, this functional abstraction process is the most powerful design tool you will be given for developing programs, and it will serve you well.